Schedule Agent
The Schedule Agent lets you view reports and update entries after logging in from a browser. You can view personal reports showing your schedule, timecard, accruals, attendance, training and notes. You can view staff reports showing the schedule for a day, week or pay period and you can view the callin list for a shift. You can also update personal information which includes your profile, availability and requests. You can submit requests to book time off from work, exchange shifts with other employees, work open shifts and receive lump sum payouts.
You can open the help manual by clicking the question mark from the login screen. The help manual opens in a new window or tab making it readily available throughout your session. The following topics will assist you in using the Schedule Agent.
1. Logging In
7. Entering Shift Exchange Requests
8. Confirming a Shift Exchange
10. Entering Open Shift Requests
Logging In
There are two different ways to log into the Schedule Agent. Badge Login requires you to enter your badge number and password to log in. Authenticated Login allows you to log in using your authenticated user name.
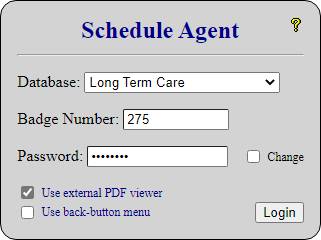
Badge Login
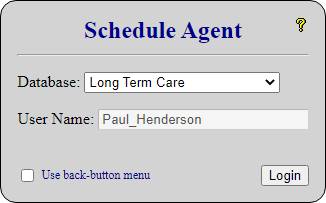
Authenticated Login
To log in, enter the following information and then click the Login button.
Database – The company or division you work for. Your selection is saved as a cookie for the next time you log in.
For Badge Login…
Badge Number – The number assigned to identify you. Leading zeros are not required. For example, you can enter 275 if your badge number is 00275.
Password – Your personal password. The password field is hidden and letters may be case sensitive as per administrative settings.
Change – Check this option to change your password after successfully logging in. You will be required to log in again after changing your password. To secure your personal information it is recommended that your password is a combination of letters, numbers and at least one symbol (for example, joe$123).
There are two options you can set prior to logging in. These are Use external PDF viewer and Use back-button menu. The option to use the external PDF viewer only applies if reports are displayed using PDF format (not HTML). Both of these options are saved as cookies for the next time you log in.
Use external PDF viewer – This option determines the interface for displaying PDF reports. By default this option is checked to use the Mozilla JavaScript PDF viewer which is the same viewer used by Firefox. You can uncheck this option if you want to use your computer’s built-in PDF viewer. It is recommended to use the external PDF viewer since some browsers, including most mobile devices, do not include a PDF viewer.
Use back-button menu – This option determines the type of menu interface you want to use to make selections. Leave this option unchecked to display the menu and your data on the same screen. Check this option to display the menu on a separate screen from your data in which case you must click the browser’s back-button to return to the menu. By default this option is checked for mobile devices to maximize the viewing area on smaller size screens.
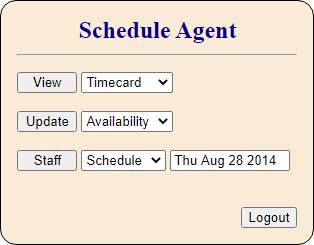
Using the Menu
The menu is displayed after successfully logging in. The menu consists of four buttons, three dropdown lists and a calendar date picker. An initial report is displayed if you are not using a back-button menu. The initial report is pre-set to show your personal schedule or timecard.
Menu and Data on same screen
Back-button menu
Click the Logout button when you are done using the Schedule Agent. Logging out clears your browser session and ensures no one can access your personal information.
Viewing Reports
To view a personal report, click the View button to run the report displayed or click the dropdown list to select and run a different report. Here are some things to know…
- Schedule will show your scheduled shifts, availability and booked time-off starting with today for a pre-determined number of days, weeks or pay periods into the future. Entries for booked time-off beyond this period are also listed.
- Calendar will show your monthly schedule for days you are allowed to view.
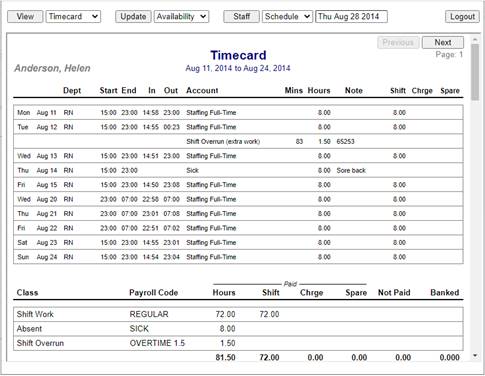
- Timecard will show your timecards for the previous pay period, the current pay period and the next pay period.
- Accruals include both allowance hours and banked hours. Allowance hours for vacation and sick time are reset each year. Allowance hours left include booked time-off. The begin balance for banked hours is the number of hours in your bank at the beginning of the current pay period. The current balance for banked hours includes booked time-off up until the end of the next reporting year.
- Attendance will show a summary of absenteeism, work and lateness for scheduled shifts in the previous 12 months.
To view a staff report, click the Staff button to run the report displayed or click the dropdown list to select and run a different report. Click the calendar date picker to select a different date for the pay period, week or day you want to report. When you select a date, the report will automatically run if you are not using a back-button menu. Here are some things to know…
- Schedule will show the schedule for one pay period at a time. You can change your schedule settings when updating your profile. Schedule settings include the order by which employees are listed.
- Day Schedule and Week Schedule will display a series of consecutive dots to identify each open shift (only applicable if you are permitted to view open shifts). You can change the order by which employees are listed when updating your profile.
- Callin List will prompt you to enter a staffing view and a shift for the day being reported. The staffing view will determine the type of employees listed (full time and/or part time) and the order by which they are listed.
Updating your Profile
To update your profile, select the Profile option from the Update dropdown list. Your profile contains contact information and schedule viewing options as shown in the following screen.

You can enter as many as three phone numbers and two e-mail addresses to be used to contact you. You can also enter your cell phone number (and mail-to-text carrier) for receiving text messages. Staff Schedule provides different options for viewing the 2-week pay period schedule.
Order – The order by which employees are listed on the schedule. Employees listed by group can be arranged so that they are listed by subgroups within each group.
Task code – Format used to display shifts on the schedule. Check this option to display shifts using the format AAA-XX where AAA is the shift code and XX is the task code (for example, D1-Or). Uncheck this option to display shifts using the format 99-AAA where 99 is the station (or department) number and AAA is the shift code (for example, 02-D1). This option is normally checked for LTC and unchecked for EMS.
Absence code – Method
used to display absences for shifts on the schedule. Check this option to
display an abbreviated code for each absence (for example, vac). Absence codes
are displayed as off if you are not allowed to view absence codes for
other employees on the schedule. Uncheck this option to display shift codes using
a strikethrough effect (for example, 02-D1).
Availability indicator – Control to determine whether or not indicators for availability are displayed on the schedule. The symbol ñ is used to show availability for employees who are not available to work whereas the symbol ã is used to show availability for employees who are available to work. The symbol ^ or an alphanumeric code following the availability indicator means part day only. You may not be allowed to view the availability indicators for other employees on the schedule.
You can also specify the order by which employees are listed when viewing the day and week schedules.
Entering Availability
You can enter the days and times when you are either not available to work, available to work or available for callin. When a scheduler needs to find someone to work a shift, employees who are available, eligible and qualified to work the shift are listed. Employees are available to work a shift if they are available during the times when the shift starts and ends.
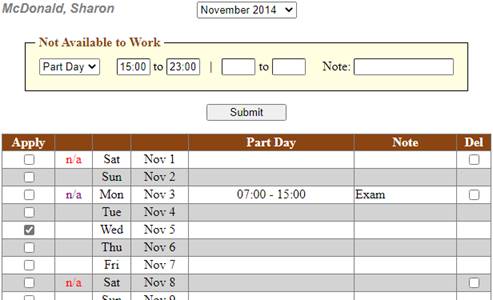
NOTE: You may be required to enter your availability by specifying the days and times when you are not available or available to start working.
Do the following to enter your availability for one or more days.
- Select Availability from the dropdown list or click the Update button if the option is already selected.
- Select the month from the dropdown list for which you want to enter your availability.
- Select Full Day to enter your availability for all shifts in a day. Select Part Day or a part day code to enter your availability for part of a day.
- For Part Day availability, enter the time(s) during which you are not available or available to work.
NOTE: You can only select a part day code in step 3 if you are not allowed to enter partial times.
- Check the box in the column titled Apply for each day in the month that you want to submit your availability as indicated in steps 3 and 4.
- Check the box in the column titled Del for any day you want to delete (remove) your availability.
- Click the Submit button to update your availability for all days that are checked.
- Repeat steps 2 to 7 to enter your availability for other days.
Your Scheduling department can apply rules to restrict days you are allowed to update in steps 5 and 6.
Entering Time-Off Requests
You can enter requests to book time off from work. You normally request time off from work for occurrences like vacation and banked lieu time. Requests are processed by an authorized person who will either accept or decline your request. The status for a request is considered pending (or waiting) until it is either accepted or declined. Waiting means the request is still pending however it is now waiting for additional availability to be submitted.
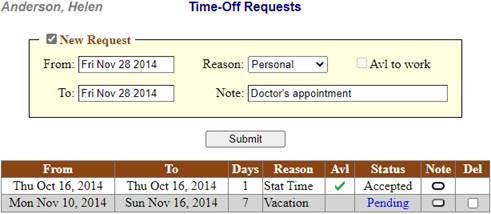
Do the following to request time off from work.
- Select Time-Off from the dropdown list or click the Update button if the option is already selected.
- Check the box titled New Request.
- Use the calendar date picker to select the first day you want off. The from and to dates are set to indicate one day off.
- To request consecutive days off, click the date box labeled To and use the calendar date picker to select the last day you want off.
- Select a reason from the dropdown list to indicate where the hours for time off are coming from (for example, vacation or stat time).
- Enter a brief note to explain the reason for time off.
- If your availability is entered as not available to work, check the box titled Avl to work if you can be contacted to work during the days you are requesting off.
- Click the Submit button to update your time off request.
To delete a pending request, check the box in the column titled Del for the entry you want to remove and then click the Submit button.
Entering Shift Exchange Requests
You can enter requests to exchange shifts with other employees. Requests are processed by an authorized person who will either accept or decline your request. The status for a request is considered pending until it is either accepted or declined.

Do the following to request a shift exchange.
- Select Shift Exchg from the dropdown list or click the Update button if the option is already selected.
- Check the box titled New Request.
- Use the calendar date picker to select the day for the shift you are scheduled to work and want to exchange.
- Click the dropdown list labeled With and select the employee with whom you want to exchange shifts.
- Click the date box labeled For and use the calendar date picker to select the day for the shift you want to work in exchange for your shift.
- If necessary, enter a brief note to explain the reason for the shift exchange.
- Click the Submit button to update your shift exchange request.
To delete a pending request, check the box in the column titled Del for the entry you want to remove and then click the Submit button.
Confirming a Shift Exchange
The Schedule Agent lets you confirm requests for shift exchanges entered by other employees who are requesting to exchange shifts with you. When you confirm a request for a shift exchange, you are sending confirmation that you are in agreement with the shift exchange. Shift exchange requests are usually processed only after they are confirmed.
NOTE: You will be notified about outstanding shift exchange requests not confirmed each time you log into the Schedule Agent.
Do the following to confirm a shift exchange request entered by another employee.
- Select Shift Exchg from the dropdown list or click the Update button if the option is already selected.
- Check the box in the column titled Confirm for the shift exchange request you want to confirm.
- Click the Submit button to update your confirmation for the shift exchange request.
Accepting a Shift Exchange
The Schedule Agent lets you accept requests for shift exchanges entered by other employees who are requesting to exchange shifts with you. You can only accept shift exchanges if employees are authorized to do so. You should only accept a shift exchange if you are in agreement with the employee who entered the request.
NOTE: You will be notified about outstanding shift exchange requests each time you log into the Schedule Agent.
Do the following to accept a shift exchange entered by another employee.
- Select Shift Exchg from the dropdown list or click the Update button if the option is already selected.
- Check the box in the column titled Accept for the shift exchange request you want to accept.
- Click the Submit button to update the schedule with the shift exchange.
You may be restricted from accepting shift exchanges for certain shifts or you may be restricted from accepting shift exchanges which fall on certain holidays. In this case the shift exchange request will be updated as confirmed for subsequent processing.
Entering Open Shift Requests
You can enter requests to work shifts which are open. You may also be allowed to enter requests to work an open shift in exchange for a shift you are already scheduled to work. Requests are processed by an authorized person who will either accept or decline your request. The status for a request is considered pending until it is either accepted or declined.
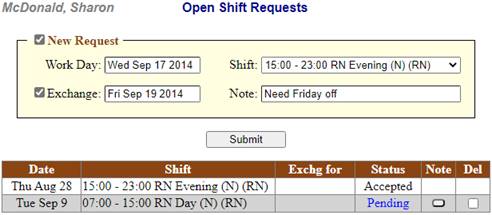
Do the following to request to work an open shift.
- Select Open Shift from the dropdown list or click the Update button if the option is already selected.
- Check the box titled New Request.
- Use the calendar date picker to select a day you are requesting to work on. A post back occurs to load open shifts on the day selected.
- Click the dropdown list labeled Shift and select the shift you are requesting to work.
- If allowed, do the following if you are requesting to work the open shift in exchange for a shift you are scheduled to work. The exchange option will be checked if you are already scheduled to work on the same day as the open shift.
a. Check the box titled Exchange.
b. Use the calendar date picker to select the day for the shift you want to exchange for the open shift.
- If necessary, enter a brief note to explain the reason for the request.
- Click the Submit button to update your open shift request.
To delete a pending request, check the box in the column titled Del for the entry you want to remove and then click the Submit button.
Entering Payout Requests
You can enter requests to receive lump sum payouts of hours owing to you. You normally request payouts for banked lieu time. Requests are processed by an authorized person who will either accept or decline your request. The status for a request is considered pending until it is either accepted or declined.
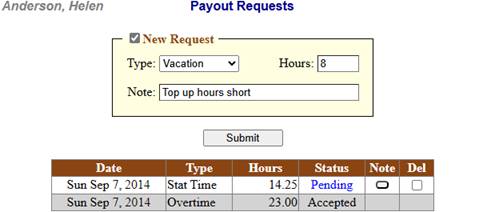
Do the following to request a lump sum payout of hours owing.
- Select Payout from the dropdown list or click the Update button if the option is already selected.
- Check the box titled New Request.
- Select the type of payout from the dropdown list to indicate where the hours are drawn from (for example, stat time or overtime).
- Enter the number of hours you want to receive payment for. The number of hours can include two decimals (for example, 10.75) and they cannot exceed 999.
- If necessary, enter a brief note to provide additional details for the payout.
- Click the Submit button to update your payout request.
To delete a pending request, check the box in the column titled Del for the entry you want to remove and then click the Submit button.